


使用tslib库
一、tslib简介
嵌入式Linux标准化触摸屏支持库,屏蔽硬件差异,提供校准、坐标转换、单点/多点触摸等功能。
二、tslib移植
1. 前提
搭建arm-linux-gnueabihf-gcc交叉编译环境。
2. 步骤
- 下载源码。
- 交叉编译:
Terminal window ./autogen.sh./configure --host=arm-linux-gnueabihf --prefix=/your/tools/tslibmakemake install - 移植文件: 将安装目录 bin/目录下的所有可执行文件拷贝到开发板/usr/bin 目录下; 将安装目录 etc/目录下的配置文件 ts.conf 拷贝到开发板/etc 目录下; 将安装目录 lib/目录下的所有库文件拷贝到开发板/usr/lib 目录下。
- 配置环境变量(开发板终端):
Terminal window export TSLIB_CONSOLEDEVICE=noneexport TSLIB_FBDEVICE=/dev/fb0export TSLIB_TSDEVICE=/dev/input/event1export TSLIB_CONFFILE=/etc/ts.confexport TSLIB_PLUGINDIR=/usr/lib/ts
三、核心库函数(需包含#include <tslib.h>)
| 函数原型 | 功能 | 关键参数/返回值 |
|---|---|---|
struct tsdev *ts_open(const char *device, int nonblock) | 打开触摸屏设备 | device:设备节点;nonblock:0=阻塞;返回设备句柄/NULL |
int ts_config(struct tsdev *ts) | 加载配置文件初始化 | 参数为设备句柄;返回0=成功/-1=失败 |
int ts_read(struct tsdev *ts, struct ts_sample *samp, int nr) | 读取单点触摸数据 | samp存储坐标/压力值;返回读取样本数 |
int ts_read_mt(struct tsdev *ts, struct ts_sample_mt *samp, int nr, int flags) | 读取多点触摸数据 | flags用TS_MT_DROP_SYNC同步;samp含触摸点编号 |
void ts_close(struct tsdev *ts) | 关闭设备 | 释放资源 |
struct tsdev *ts_setup(const char *dev_name, int nonblock) | 整合打开与配置 | 简化初始化,返回设备句柄/NULL |
关键结构体
- 单点触摸:
struct ts_sample {int x; //X 坐标int y; //Y 坐标unsigned int pressure; //按压力大小struct timeval tv; //时间};
- 多点触摸:
struct ts_sample_mt {/* ABS_MT_* event codes. linux/include/uapi/linux/input-event-codes.h* has the definitions.*/int x; //X 坐标int y; //Y 坐标unsigned int pressure; //按压力大小int slot; //触摸点 slotint tracking_id; //IDint tool_type;int tool_x;int tool_y;unsigned int touch_major;unsigned int width_major;unsigned int touch_minor;unsigned int width_minor;int orientation;int distance;int blob_id;struct timeval tv; //时间/* BTN_TOUCH state */short pen_down; //BTN_TOUCH 的状态/* valid is set != 0 if this sample* contains new data; see below for the* bits that get set.* valid is set to 0 otherwise*/short valid; //此次样本是否有效标志 触摸点数据是否发生更新};
四、应用程序开发
1. 单点触摸示例
#include <stdio.h> #include <stdlib.h> #include <tslib.h> //包含 tslib.h 头文件
int main(int argc, char *argv[]) { struct tsdev *ts = NULL; struct ts_sample samp; int pressure = 0;//用于保存上一次的按压力,初始为 0,表示松开
/* 打开并配置触摸屏设备 */ ts = ts_setup(NULL, 0); if (NULL == ts) { fprintf(stderr, "ts_setup error"); exit(EXIT_FAILURE); }
/* 读数据 */ for ( ; ; ) {
if (0 > ts_read(ts, &samp, 1)) { fprintf(stderr, "ts_read error"); ts_close(ts); exit(EXIT_FAILURE); }
if (samp.pressure) {//按压力>0 if (pressure) //若上一次的按压力>0
printf("移动(%d, %d)\n", samp.x, samp.y); else printf("按下(%d, %d)\n", samp.x, samp.y); } else printf("松开\n");//打印坐标
pressure = samp.pressure; }
ts_close(ts); exit(EXIT_SUCCESS); }2. 多点触摸示例
#include <stdio.h> #include <stdlib.h> #include <sys/ioctl.h> #include <linux/input.h> #include <tslib.h>
int main(int argc, char *argv[]) { struct tsdev *ts = NULL; struct ts_sample_mt *mt_ptr = NULL; struct input_absinfo slot; int max_slots; unsigned int pressure[12] = {0}; //用于保存每一个触摸点上一次的按压力,初始为 0,表示松开 int i;
/* 打开并配置触摸屏设备 */ ts = ts_setup(NULL, 0); if (NULL == ts) { fprintf(stderr, "ts_setup error"); exit(EXIT_FAILURE);
}
/* 获取触摸屏支持的最大触摸点数 */ if (0 > ioctl(ts_fd(ts), EVIOCGABS(ABS_MT_SLOT), &slot)) { perror("ioctl error"); ts_close(ts); exit(EXIT_FAILURE); }
max_slots = slot.maximum + 1 - slot.minimum; printf("max_slots: %d\n", max_slots);
/* 内存分配 */ mt_ptr = calloc(max_slots, sizeof(struct ts_sample_mt));
/* 读数据 */ for ( ; ; ) {
if (0 > ts_read_mt(ts, &mt_ptr, max_slots, 1)) { perror("ts_read_mt error"); ts_close(ts); free(mt_ptr); exit(EXIT_FAILURE); }
for (i = 0; i < max_slots; i++) {
if (mt_ptr[i].valid) {//有效表示有更新! if (mt_ptr[i].pressure) { //如果按压力>0 if (pressure[mt_ptr[i].slot])//如果上一次的按压力>0 printf("slot<%d>, 移动(%d, %d)\n", mt_ptr[i].slot, mt_ptr[i].x, mt_ptr[i].y); else printf("slot<%d>, 按下(%d, %d)\n", mt_ptr[i].slot, mt_ptr[i].x, mt_ptr[i].y); } else printf("slot<%d>, 松开\n", mt_ptr[i].slot);
pressure[mt_ptr[i].slot] = mt_ptr[i].pressure; } } }
/* 关闭设备、释放内存、退出 */
ts_close(ts); free(mt_ptr); exit(EXIT_SUCCESS); }3. 编译与运行
# 编译${CC} -I /home/dt/tools/tslib/include -L /home/dt/tools/tslib/lib -lts -o testApp testApp.c# 开发板运行五、测试工具
ts_calibrate:触摸校准,生成/etc/pointercal,按提示点击校准点。ts_test:功能测试,验证触摸坐标、压力值,支持模式切换。
六、注意事项
- 设备节点通过
ls /dev/input/确认(常见event0/event1)。 - 环境变量需配置正确,否则库加载失败。
- 交叉编译器需匹配ARM架构,避免执行错误。
- 触摸无响应时,排查节点、文件移植完整性、环境变量。当前文件内容过长,豆包只阅读了前 18%。
FrameBuffer 屏幕参数与 BMP 图像解析
一、ioctl() 获取屏幕参数核心逻辑
ioctl() 是 Linux 系统中用于设备控制的核心系统调用,在 FrameBuffer 编程中,通过它可获取屏幕的固定硬件属性和可变显示参数,为后续显存操作、颜色适配提供基础。其核心作用是与帧缓冲驱动交互,读取 fb_var_screeninfo(可变信息)和 fb_fix_screeninfo(固定信息)两大结构体数据。
关键 ioctl 命令
| 命令 | 作用 | 关联结构体 |
|---|---|---|
FBIOGET_VSCREENINFO | 获取可变屏幕参数(分辨率、色深等) | struct fb_var_screeninfo |
FBIOGET_FSCREENINFO | 获取固定屏幕参数(显存地址、行字节数等) | struct fb_fix_screeninfo |
二、mmap 映射核心原理与优势
1. 映射本质
mmap() 是 Linux 提供的“存储映射 I/O”机制,核心是将内核态的显存物理内存,直接映射到应用程序的用户态虚拟地址空间。映射后,应用程序无需通过 read()/write() 系统调用(避免两次数据拷贝),可像操作普通内存一样直接读写显存,实现“零拷贝”高效访问。
2. 与普通 I/O 的对比(为什么用 mmap)
| 操作方式 | 流程 | 开销 | 适用场景 |
|---|---|---|---|
| 普通 I/O(read/write) | 用户态数据 → 内核缓冲区 → 显存 | 两次拷贝+系统调用开销 | 小数据量读写 |
| mmap 映射 | 用户态直接读写显存(无中间缓冲区) | 零拷贝+仅一次映射开销 | 帧缓冲高频读写(如 LCD 刷新) |
3. mmap 映射关键注意事项
- 映射大小:优先使用
fix_info.smem_len(驱动提供的准确显存长度),避免因分辨率+行字节数计算偏差导致越界; - 权限设置:必须指定
PROT_READ | PROT_WRITE(可读可写),否则无法修改显存内容; - 映射类型:使用
MAP_SHARED(共享映射),确保修改同步到物理显存(MAP_PRIVATE仅修改用户态副本,屏幕无变化); - 资源释放:程序结束前必须调用
munmap(fb_base, fb_size)解除映射,否则会导致内存泄漏; - 设备关闭:
mmap后文件描述符fb_fd不能立即关闭,需在munmap后关闭(关闭后映射仍有效,但不推荐)。
三、核心结构体详解
1. struct fb_var_screeninfo(可变屏幕信息)
存储可动态配置的显示参数,支持读写操作,核心字段决定屏幕显示效果:
struct fb_var_screeninfo { __u32 xres; /* 可视区域,一行有多少个像素点,X 分辨率 */ __u32 yres; /* 可视区域,一列有多少个像素点,Y 分辨率 */ __u32 xres_virtual; /* 虚拟区域,一行有多少个像素点 */ __u32 yres_virtual; /* 虚拟区域,一列有多少个像素点 */ __u32 xoffset; /* 虚拟到可见屏幕之间的行偏移 */ __u32 yoffset; /* 虚拟到可见屏幕之间的列偏移 */
__u32 bits_per_pixel; /* 每个像素点使用多少个 bit 来描述,也就是像素深度 bpp */ __u32 grayscale; /* =0 表示彩色, =1 表示灰度, >1 表示 FOURCC 颜色 */
/* 用于描述 R、G、B 三种颜色分量分别用多少位来表示以及它们各自的偏移量 */ struct fb_bitfield red; /* Red 颜色分量色域偏移 */ struct fb_bitfield green; /* Green 颜色分量色域偏移 */ struct fb_bitfield blue; /* Blue 颜色分量色域偏移 */ struct fb_bitfield transp; /* 透明度分量色域偏移 */
__u32 nonstd; /* nonstd 等于 0,表示标准像素格式;不等于 0 则表示非标准像素格式 */ __u32 activate;
__u32 height; /* 用来描述 LCD 屏显示图像的高度(以毫米为单位) */ __u32 width; /* 用来描述 LCD 屏显示图像的宽度(以毫米为单位) */
__u32 accel_flags;
/* 以下这些变量表示时序参数 */ __u32 pixclock; /* pixel clock in ps (pico seconds) */ __u32 left_margin; /* time from sync to picture */ __u32 right_margin; /* time from picture to sync */ __u32 upper_margin; /* time from sync to picture */ __u32 lower_margin; __u32 hsync_len; /* length of horizontal sync */ __u32 vsync_len; /* length of vertical sync */ __u32 sync; /* see FB_SYNC_* */ __u32 vmode; /* see FB_VMODE_* */ __u32 rotate; /* angle we rotate counter clockwise */ __u32 colorspace; /* colorspace for FOURCC-based modes */ __u32 reserved[4]; /* Reserved for future compatibility */};通过 xres、yres 获取到屏幕的水平分辨率和垂直分辨率,bits_per_pixel 表示像素深度 bpp,即每一个像 素点使用多少个 bit 位来描述它的颜色,通过 xres * yres * bits_per_pixel / 8 计算可得到整个显示缓存区的大 小。
2. struct fb_fix_screeninfo(固定屏幕信息)
存储硬件相关的固定属性,仅支持读取,核心字段与显存布局直接相关:
struct fb_fix_screeninfo { char id[16]; /* 字符串形式的标识符 */ unsigned long smem_start; /* 显存的起始地址(物理地址) */
__u32 smem_len; /* 显存的长度 */ __u32 type; __u32 type_aux; __u32 visual; __u16 xpanstep; __u16 ypanstep; __u16 ywrapstep; __u32 line_length; /* 一行的字节数 */ unsigned long mmio_start; /* Start of Memory Mapped I/O(physical address) */ __u32 mmio_len; /* Length of Memory Mapped I/O */ __u32 accel; /* Indicate to driver which specific chip/card we have */ __u16 capabilities; __u16 reserved[2];};smem_start 表示显存的起始地址,这是一个物理地址,当然在应用层无法直接使用;smem_len 表示显 存的长度,这个长度并一定等于 LCD 实际的显存大小。line_length 表示屏幕的一行像素点有多少个字节, 通常可以使用 line_length * yres 来得到屏幕显示缓冲区的大小。
3. struct fb_bitfield(颜色位段信息)
red、green、blue 描述了 RGB 颜色值中 R、G、B 三种颜色通道分别使用多少 bit 来表示以及它们各自 的偏移量,通过 red、green、blue 变量可知道 LCD 的 RGB 像素格式,譬如是 RGB888 还是 RGB565,亦或 者是 BGR888、BGR565 等。struct fb_bitfield 结构体如下所示:
struct fb_bitfield { __u32 offset; /* 偏移量 */ __u32 length; /* 长度 */ __u32 msb_right; /* != 0 : Most significant bit is right */};四、常见 RGB 像素格式(基于 fb_bitfield 解析)
通过 fb_var_screeninfo 中的 red/green/blue 字段,可判断屏幕支持的 RGB 格式,嵌入式常用以下两种:
| 格式 | 总位数 | 位段分布(高位→低位) | fb_bitfield 配置示例(以小端为例) | 适用场景 |
|---|---|---|---|---|
| RGB565 | 16 | R(5)→G(6)→B(5) | red: offset=11, length=5 green: offset=5, length=6 blue: offset=0, length=5 | 中低端 LCD(节省显存) |
| RGB888 | 24 | R(8)→G(8)→B(8) | red: offset=16, length=8 green: offset=8, length=8 blue: offset=0, length=8 | 高清 LCD(颜色保真) |
| BGR888 | 24 | B(8)→G(8)→R(8) | red: offset=0, length=8 green: offset=8, length=8 blue: offset=16, length=8 | Windows 位图默认格式 |
格式转换核心逻辑
- RGB888 → RGB565:取 R 高5位、G 高6位、B 高5位,拼接为 16 位值;
- BGR888 → RGB565:先交换 R/B 通道,再按上述规则压缩。
示例代码 LCD 画点、画线、画矩形操作
#include <stdio.h>#include <stdlib.h>#include <sys/types.h>#include <sys/stat.h>#include <fcntl.h>#include <unistd.h>#include <sys/ioctl.h>#include <sys/mman.h>
#include <linux/fb.h>
#define argb8888_to_rgb565(color) ({ \ unsigned int temp = (color); \ ((temp & 0xF80000UL) >> 8) | \ ((temp & 0xFC00UL) >> 5) | \ ((temp & 0xF8UL) >> 3); \ })
static int width; //LCD X 分辨率static int height; //LCD Y 分辨率static unsigned short *screen_base = NULL; //映射后的显存基地址
/******************************************************************** * 函数名称: lcd_draw_point * 功能描述: 打点 * 输入参数: x, y, color * 返 回 值: 无 ********************************************************************/static void lcd_draw_point(unsigned int x, unsigned int y, unsigned int color){ unsigned short rgb565_color = argb8888_to_rgb565(color);//得到 RGB565 颜色值
/* 对传入参数的校验 */ if (x >= width) x = width - 1; if (y >= height) y = height - 1;
/* 填充颜色 */ screen_base[y * width + x] = rgb565_color;}
/******************************************************************** * 函数名称: lcd_draw_line * 功能描述: 画线(水平或垂直线) * 输入参数: x, y, dir, length, color * 返 回 值: 无 ********************************************************************/static void lcd_draw_line(unsigned int x, unsigned int y, int dir, unsigned int length, unsigned int color){ unsigned short rgb565_color = argb8888_to_rgb565(color);//得到 RGB565 颜色值
unsigned int end; unsigned long temp;
/* 对传入参数的校验 */ if (x >= width) x = width - 1; if (y >= height) y = height - 1;
/* 填充颜色 */ temp = y * width + x;//定位到起点 if (dir) { //水平线 end = x + length - 1; if (end >= width) end = width - 1;
for ( ; x <= end; x++, temp++) screen_base[temp] = rgb565_color; } else { //垂直线 end = y + length - 1; if (end >= height) end = height - 1;
for ( ; y <= end; y++, temp += width) screen_base[temp] = rgb565_color; }}
/******************************************************************** * 函数名称: lcd_draw_rectangle * 功能描述: 画矩形 * 输入参数: start_x, end_x, start_y, end_y, color * 返 回 值: 无 ********************************************************************/static void lcd_draw_rectangle(unsigned int start_x, unsigned int end_x, unsigned int start_y, unsigned int end_y, unsigned int color){ int x_len = end_x - start_x + 1; int y_len = end_y - start_y - 1;
lcd_draw_line(start_x, start_y, 1, x_len, color);//上边
lcd_draw_line(start_x, end_y, 1, x_len, color); //下边 lcd_draw_line(start_x, start_y + 1, 0, y_len, color);//左边 lcd_draw_line(end_x, start_y + 1, 0, y_len, color);//右边}
/******************************************************************** * 函数名称: lcd_fill * 功能描述: 将一个矩形区域填充为参数 color 所指定的颜色 * 输入参数: start_x, end_x, start_y, end_y, color * 返 回 值: 无 ********************************************************************/static void lcd_fill(unsigned int start_x, unsigned int end_x, unsigned int start_y, unsigned int end_y, unsigned int color){ unsigned short rgb565_color = argb8888_to_rgb565(color);//得到 RGB565 颜色值 unsigned long temp; unsigned int x;
/* 对传入参数的校验 */ if (end_x >= width) end_x = width - 1; if (end_y >= height) end_y = height - 1;
/* 填充颜色 */ temp = start_y * width; //定位到起点行首 for ( ; start_y <= end_y; start_y++, temp+=width) {
for (x = start_x; x <= end_x; x++) screen_base[temp + x] = rgb565_color; }}
int main(int argc, char *argv[]){ struct fb_fix_screeninfo fb_fix; struct fb_var_screeninfo fb_var; unsigned int screen_size; int fd;
/* 打开 framebuffer 设备 */ if (0 > (fd = open("/dev/fb0", O_RDWR))) {
perror("open error"); exit(EXIT_FAILURE); }
/* 获取参数信息 */ ioctl(fd, FBIOGET_VSCREENINFO, &fb_var); ioctl(fd, FBIOGET_FSCREENINFO, &fb_fix);
screen_size = fb_fix.line_length * fb_var.yres; width = fb_var.xres; height = fb_var.yres;
/* 将显示缓冲区映射到进程地址空间 */ screen_base = mmap(NULL, screen_size, PROT_WRITE, MAP_SHARED, fd, 0); if (MAP_FAILED == (void *)screen_base) { perror("mmap error"); close(fd); exit(EXIT_FAILURE); }
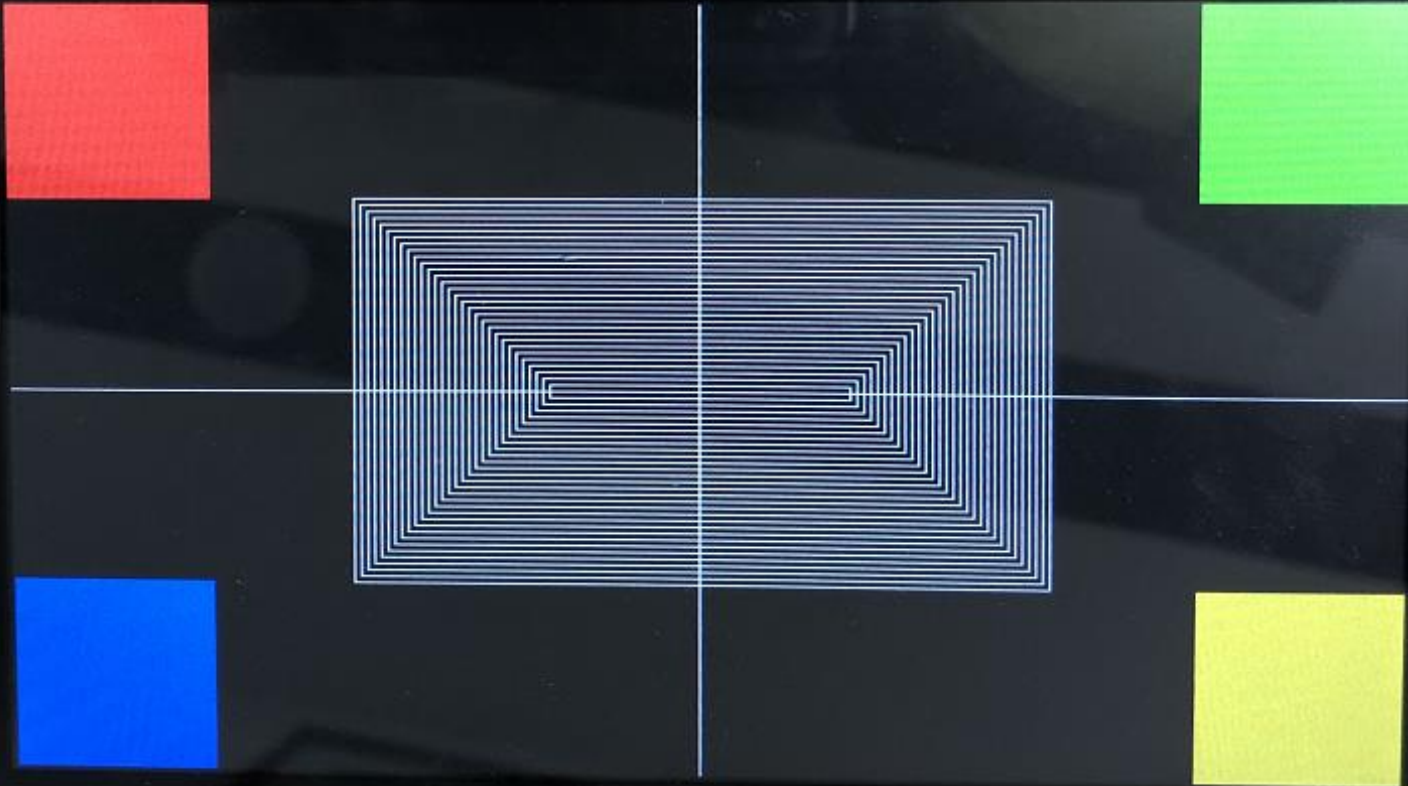
/* 画正方形方块 */ int w = height * 0.25;//方块的宽度为 1/4 屏幕高度 lcd_fill(0, width-1, 0, height-1, 0x0); //清屏(屏幕显示黑色) lcd_fill(0, w, 0, w, 0xFF0000); //红色方块 lcd_fill(width-w, width-1, 0, w, 0xFF00); //绿色方块 lcd_fill(0, w, height-w, height-1, 0xFF); //蓝色方块 lcd_fill(width-w, width-1, height-w, height-1, 0xFFFF00);//黄色方块
/* 画线: 十字交叉线 */ lcd_draw_line(0, height * 0.5, 1, width, 0xFFFFFF);//白色线 lcd_draw_line(width * 0.5, 0, 0, height, 0xFFFFFF);//白色线
/* 画矩形 */ unsigned int s_x, s_y, e_x, e_y; s_x = 0.25 * width; s_y = w; e_x = width - s_x; e_y = height - s_y;
for ( ; (s_x <= e_x) && (s_y <= e_y); s_x+=5, s_y+=5, e_x-=5, e_y-=5) lcd_draw_rectangle(s_x, e_x, s_y, e_y, 0xFFFFFF);
/* 退出 */ munmap(screen_base, screen_size); //取消映射 close(fd); //关闭文件 exit(EXIT_SUCCESS); //退出进程}在示例代码中定义了一个宏 argb8888_to_rgb565,用于实现将 unsigned int 类型的颜色(也就是
ARGB8888 颜色)转换为 RGB565 颜色。
程序中自定义了 4 个函数:
lcd_draw_point:用于实现画点、打点操作,参数 x 和 y 指定像素点的位置,参数 color 表示颜色。
lcd_draw_line:用于实现画线操作,参数 x 和 y 指定线的起始位置;参数 dir 表示方向,水平方向(dir!=0)
还是垂直方向(dir=0),不支持斜线画法,画斜线需要一些算法去操作,这不是本章内容需要去关注的知识
点;参数 length 表示线的长度,以像素为单位;参数 color 表示线条的颜色。
lcd_draw_rectangle:用于实现画矩形操作,参数 start_x 和 start_y 指定矩形左上角的位置;参数 end_x
和 end_y 指定矩形右下角的位置;参数 color 指定矩形 4 个边的线条颜色。
lcd_fill:将一个指定的矩形区域填充为参数 color 指定的颜色,参数 start_x 和 start_y 指定矩形左上角
的位置;参数 end_x 和 end_y 指定矩形右下角的位置;参数 color 指定矩形区域填充的颜色。
五、BMP 图像完整解析
BMP(全称 Bitmap)是 Window 操作系统中的标准图像文件格式,文件后缀名为“.bmp”,使用非常广。它采用位映射存储格式,除了图像深度可选以外,图像数据没有进行任何压缩,因此,BMP 图像文件所占用的空间很大,但是没有失真、并且解析 BMP 图像简单。
BMP 文件的图像深度可选 1bit、4bit、8bit、16bit、24bit 以及 32bit,典型的 BMP 图像文件由四部分组成。
一般常见的图像都是以 16 位(R、G、B 三种颜色分别使用 5bit、6bit、5bit 来表示)、24 位(R、G、B 三种颜色都使用 8bit 来表示)色图像为主,我们称这样的图像为真彩色图像,真彩色图像是不需要调色板的,即位图信息头后面紧跟的就是位图数据了。
对某些 BMP 位图文件说并非如此,譬如 16 色位图、256 色位图,它们需要使用到调色板,具体调色板的使用由图像的位深度决定。
一、BMP文件整体结构
BMP文件 = 文件头(14字节) + 信息头(40字节) + 调色板(可选) + 像素数据(核心)各部分按顺序存储,通过文件头中的「数据偏移量」定位像素数据起始位置,信息头描述图像核心参数,像素数据存储实际颜色信息。
二、各部分位段功能详解
1. 文件头(14字节):标识文件属性,定位像素数据
| 字节偏移 | 位数(bit) | 字段名称 | 核心作用 |
|---|---|---|---|
| 0~1 | 16 | bfType | 文件标识,固定为 0x4D42(ASCII 码 'BM'),用于判断是否为标准BMP文件 |
| 2~5 | 32 | bfSize | BMP文件总大小(字节),包含文件头、信息头、调色板、像素数据的全部长度 |
| 6~7 | 16 | bfReserved1 | 保留字段,固定为0 |
| 8~9 | 16 | bfReserved2 | 保留字段,固定为0 |
| 10~13 | 32 | bfOffBits | 像素数据偏移量(字节):从文件开头到像素数据的总字节数(标准无调色板时为54) |
2. 信息头(40字节):描述图像核心参数
| 字节偏移 | 位数(bit) | 字段名称 | 核心作用 |
|---|---|---|---|
| 14~17 | 32 | biSize | 信息头自身大小(固定为40字节),用于验证信息头完整性 |
| 18~21 | 32 | biWidth | 图像宽度(像素),如800、480 |
| 22~25 | 32 | biHeight | 图像高度(像素):正数表示像素「从下到上」存储,负数表示「从上到下」存储 |
| 26~27 | 16 | biPlanes | 色彩平面数,固定为1(BMP标准要求) |
| 28~29 | 16 | biBitCount | 像素深度(每个像素占用的bit数):常见1/4/8/16/24/32位,决定颜色精度 |
| 30~33 | 32 | biCompression | 压缩方式,固定为0(BI_RGB,无压缩),嵌入式常用此格式 |
| 34~37 | 32 | biSizeImage | 像素数据总大小(字节):无压缩时可设0,由宽度×高度×位深度/8计算 |
| 38~41 | 32 | biXPelsPerMeter | 水平分辨率(像素/米),用于打印适配,嵌入式显示可忽略 |
| 42~45 | 32 | biYPelsPerMeter | 垂直分辨率(像素/米),同上 |
| 46~49 | 32 | biClrUsed | 实际使用的调色板颜色数:0表示使用全部调色板(仅低色深时有效) |
| 50~53 | 32 | biClrImportant | 重要颜色数:0表示所有颜色都重要,影响图像显示优先级 |
3. 调色板(可选):低色深图像的颜色映射表
仅当 biBitCount ≤ 8位 时存在(如1位黑白图、8位灰度图),用于将「像素索引」映射为真实RGB颜色。
- 每个调色板项占4字节(32位),位段分布:
B(8位) + G(8位) + R(8位) + 保留(8位) - 例:8位BMP的调色板含256个项,像素数据中每个字节是「调色板索引」,需通过调色板查询实际RGB值。
- 嵌入式常用的24位/32位BMP无调色板,像素数据直接存储RGB/RGBA值。
4. 像素数据:存储实际图像颜色信息
这是BMP的核心部分,占用字节数 = 图像宽度 × 图像高度 ×(biBitCount / 8),需注意两个关键规则:
(1)颜色存储顺序
- 默认是 BGR 顺序(与RGB相反):
- 24位BMP:每个像素占3字节,位段为
B(8位) → G(8位) → R(8位)(如纯红为0x0000FF); - 32位BMP:每个像素占4字节,位段为
B(8位) → G(8位) → R(8位) → A(8位)(A为透明度,嵌入式LCD通常忽略); - 16位BMP:常见
R5G6B5格式(R5位+G6位+B5位),需与LCD像素格式适配。
- 24位BMP:每个像素占3字节,位段为
(2)行对齐规则
每行像素数据的字节数必须是4的倍数,不足时补0(补齐字节数 = (宽度×位深度/8 + 3) & ~3)。
例:24位、宽度为800的BMP,每行字节数 = 800×3 = 2400(2400是4的倍数,无需补齐);若宽度为801,则每行字节数 = (801×3 + 3) & ~3 = 2406(补3个0字节)。
三、核心位段关联逻辑
- 通过文件头的
bfOffBits跳过文件头、信息头(及调色板),直接定位到像素数据; - 信息头的
biWidth/biHeight决定图像分辨率,biBitCount决定像素存储格式; - 像素数据的BGR顺序需转换为LCD支持的RGB格式(如RGB565),行对齐补齐的0字节需跳过,否则会导致图像错位。
四、BMP图像解析核心代码示例
#include <stdio.h>#include <stdlib.h>#include <sys/types.h>#include <sys/stat.h>#include <fcntl.h>#include <unistd.h>#include <sys/ioctl.h>#include <string.h>#include <linux/fb.h>#include <sys/mman.h>
/**** BMP 文件头数据结构 ****/typedef struct {
unsigned char type[2]; //文件类型 unsigned int size; //文件大小 unsigned short reserved1; //保留字段 1 unsigned short reserved2; //保留字段 2 unsigned int offset; //到位图数据的偏移量} __attribute__ ((packed)) bmp_file_header;
/**** 位图信息头数据结构 ****/typedef struct { unsigned int size; //位图信息头大小 int width; //图像宽度 int height; //图像高度 unsigned short planes; //位面数 unsigned short bpp; //像素深度 unsigned int compression; //压缩方式 unsigned int image_size; //图像大小 int x_pels_per_meter; //像素/米 int y_pels_per_meter; //像素/米 unsigned int clr_used; unsigned int clr_omportant;} __attribute__ ((packed)) bmp_info_header;
/**** 静态全局变量 ****/static int width; //LCD X 分辨率static int height; //LCD Y 分辨率static unsigned short *screen_base = NULL; //映射后的显存基地址static unsigned long line_length; //LCD 一行的长度(字节为单位)
/******************************************************************** * 函数名称: show_bmp_image * 功能描述: 在 LCD 上显示指定的 BMP 图片 * 输入参数: 文件路径 * 返 回 值: 成功返回 0, 失败返回-1 ********************************************************************/static int show_bmp_image(const char *path){ bmp_file_header file_h; bmp_info_header info_h; unsigned short *line_buf = NULL; //行缓冲区 unsigned long line_bytes; //BMP 图像一行的字节的大小 unsigned int min_h, min_bytes; int fd = -1; int j;
/* 打开文件 */ if (0 > (fd = open(path, O_RDONLY))) { perror("open error"); return -1; }
/* 读取 BMP 文件头 */ if (sizeof(bmp_file_header) != read(fd, &file_h, sizeof(bmp_file_header))) { perror("read error"); close(fd); return -1; }
if (0 != memcmp(file_h.type, "BM", 2)) { fprintf(stderr, "it's not a BMP file\n"); close(fd); return -1; }
/* 读取位图信息头 */ if (sizeof(bmp_info_header) != read(fd, &info_h, sizeof(bmp_info_header))) { perror("read error"); close(fd); return -1; }
/* 打印信息 */ printf("文件大小: %d\n" "位图数据的偏移量: %d\n" "位图信息头大小: %d\n" "图像分辨率: %d*%d\n" "像素深度: %d\n", file_h.size, file_h.offset, info_h.size, info_h.width, info_h.height, info_h.bpp);
/* 将文件读写位置移动到图像数据开始处 */ if (-1 == lseek(fd, file_h.offset, SEEK_SET)) { perror("lseek error"); close(fd); return -1;
}
/* 申请一个 buf、暂存 bmp 图像的一行数据 */ line_bytes = info_h.width * info_h.bpp / 8; line_buf = malloc(line_bytes); if (NULL == line_buf) { fprintf(stderr, "malloc error\n"); close(fd); return -1; }
if (line_length > line_bytes) min_bytes = line_bytes; else min_bytes = line_length;
/**** 读取图像数据显示到 LCD ****/ /******************************************* * 为了软件处理上方便,这个示例代码便不去做兼容性设计了 * 如果你想做兼容, 可能需要判断传入的 BMP 图像是 565 还是 888 * 如何判断呢?文档里边说的很清楚了 * 我们默认传入的 bmp 图像是 RGB565 格式 *******************************************/ if (0 < info_h.height) {//倒向位图 if (info_h.height > height) { min_h = height; lseek(fd, (info_h.height - height) * line_bytes, SEEK_CUR); screen_base += width * (height - 1); //定位到屏幕左下角位置 } else { min_h = info_h.height; screen_base += width * (info_h.height - 1); //定位到....不知怎么描述 懂的人自然懂! }
for (j = min_h; j > 0; screen_base -= width, j--) { read(fd, line_buf, line_bytes); //读取出图像数据 memcpy(screen_base, line_buf, min_bytes);//刷入 LCD 显存 } } else { //正向位图 int temp = 0 - info_h.height; //负数转成正数 if (temp > height) min_h = height;
else min_h = temp;
for (j = 0; j < min_h; j++, screen_base += width) { read(fd, line_buf, line_bytes); memcpy(screen_base, line_buf, min_bytes); } }
/* 关闭文件、函数返回 */ close(fd); free(line_buf); return 0;}
int main(int argc, char *argv[]){ struct fb_fix_screeninfo fb_fix; struct fb_var_screeninfo fb_var; unsigned int screen_size; int fd;
/* 传参校验 */ if (2 != argc) { fprintf(stderr, "usage: %s <bmp_file>\n", argv[0]); exit(-1); }
/* 打开 framebuffer 设备 */ if (0 > (fd = open("/dev/fb0", O_RDWR))) { perror("open error"); exit(EXIT_FAILURE); }
/* 获取参数信息 */ ioctl(fd, FBIOGET_VSCREENINFO, &fb_var); ioctl(fd, FBIOGET_FSCREENINFO, &fb_fix);
screen_size = fb_fix.line_length * fb_var.yres; line_length = fb_fix.line_length; width = fb_var.xres; height = fb_var.yres;
/* 将显示缓冲区映射到进程地址空间 */ screen_base = mmap(NULL, screen_size, PROT_WRITE, MAP_SHARED, fd, 0); if (MAP_FAILED == (void *)screen_base) { perror("mmap error"); close(fd); exit(EXIT_FAILURE); }
/* 显示 BMP 图片 */ memset(screen_base, 0xFF, screen_size); show_bmp_image(argv[1]);
/* 退出 */ munmap(screen_base, screen_size); //取消映射 close(fd); //关闭文件 exit(EXIT_SUCCESS); //退出进程}六、关键注意事项
- 屏幕参数与 BMP 适配:显示 BMP 前需确保 BMP 分辨率 ≤ 屏幕分辨率,或通过缩放算法适配;
- 颜色格式统一:BMP 默认 BGR 格式,需转换为屏幕支持的 RGB 格式(如 RGB565);
- 显存操作:通过
mmap映射smem_start后,按line_length计算每行偏移,避免越界; - 调色板处理:低色深 BMP 必须解析调色板,将索引值转换为真实 RGB 颜色。
Some information may be outdated